Thursday, April 28, 2011

Super Moist vanilla Cake / Never fail cake

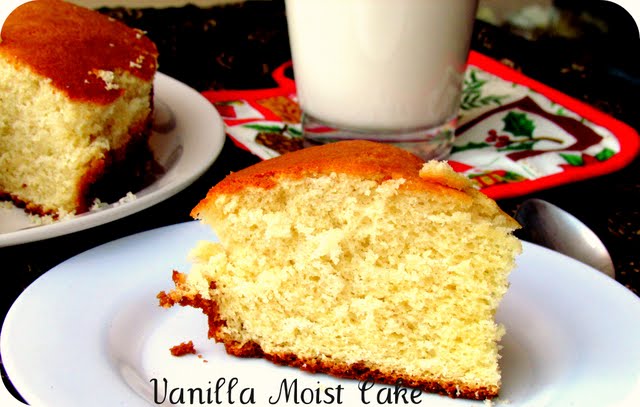
 When I saw the title as "Never fail cake " in Cooking Is Easy blog,I cudn't resist myself from doing.The pictures were so impressing too.This is a full proof recipe and can never fail at any point,if u follow the recipe fully.This is originally a Betty Crocker recipe.Today I didnt plan to do.Rohith was getting bored and was asking for cake.So this recipe struck me and prepared along with Rohith.He was very helpful as u see in the collage.He likes to beat the cake all by himself.I was literally pulling the beater from him .The outcome was so perfect and all of us enjoyed it thoroughly.The cake was too fluffy and moist. It  was just like the store bought one.See this link for converting weight into grams .

Pans:
Use two 8 inch pans
Ingredients:
1.All-purpose flour    -                2 1/4 cups  
2.Sugar                        -                1 1/2 cups  
3.Butter                       -                1 stick  (8 tbsp / 4 oz /  1/2 cup)
4.Milk                         -                 1 1/4 cup 
5.Salt                           -                 1 tsp
6.Vanilla Extract          -                 1 1/4 tsp
7.Baking pwdr              -                 3 1/2 tsp
8.Eggs                           -                 3

Method:
* Pre- heat the oven for 350 degrees Farenhiet.
* Sift all purpose flour with salt and baking powder.Mix them well and keep it aside.
* Bring butter to room temperature.
* Take a mixing bowl,add butter and sugar.Beat them well.My son was very helpfull in beating the mix.
* Add eggs and vanilla extract.Let us beat them at high speed untill,it becomes fluffy.The more we beat,the more fluffiness we can get in the cake.
* Add the milk and beat the mix once or twise,just to make sure the milk is blended well into the mix.
*  Now bring ur beater to slow speed and add the flour mix.Slowly fold the mix and let it get mixed well without any lumps.Dont beat it.Just fold in.Because,if u beat it hard after adding the flour,then your cake wil not rise.
* The quantity ,I have mentioned here makes a really big cake.So take two round pans or a single large rectangle pan ,grease them first with butter.Then flour them .This helps the cake to rise a bit.
* Pour the batter in each cake pan and bake it for 35 to 40 mins or untill the fork comes out clean.Bake the cakes in batches.
* Transfer it to the wire rack and cool completely.
* Cut the cake into cubes and store it in a air tight container.(Sorry for the rough cuts on the cake.Rohith was doing all the mess while he was cutting it).

Note:
* The cake will rise upto 1/4 the size.So use a larger pan.
* Pre heat the oven for atleast 20 mins.
* While pouring the batter into the pan,fill it 3/4 the the space as the cake will rise a lot.
*Each oven has different settings,so bake the cake ,untill toothpick comes out clean.
* To convert cups to grams ,take 1 cup of all purpose flour ,that roughly equivalent to 140 gm.

Tuesday, April 26, 2011

Crispy Rava Dosai

Rava dosai is an instant tiffin,which can be prepared in  no time.The batter shud be watery and poured into a thin & cripy dosai.This is a most wanted tiffin in south Indian cuisine.Here, I have adapted the recipe from Vah chef.I have used butter milk to dilute the batter.This gives a tangy taste to the dosai.The dosai was yummy and cripy.


Recipe Courtesy : Vah chef

Ingredients:
1.Rava/Sooji                                   -          1 cup
2.Rice flour                                     -           1 cup
3.Maida/all pupose flour                 -           1/4 cup
4.Butter milk                                    -           4 cups
5.Ginger                                           -           1 tsp (minced)
6.Green chillies                                -           3 (chopped)
7.Pepper corns                                  -           1 tsp
8.Cumin seeds                                   -           1 tsp
9.Cilantro                                          -           hand ful

Method:
* Take a mixing bowl and mix all the ingredients into a thin batter.I had 1 cup of butter milk ,so i substituted with 3 cups of plain water.
* Heat the griddle to maximum temp,pour the batter like sprinkles,throught the griddle.Make sure ,that u connect the batter well,so that it forms a dosai.


* Check the corners using the spatula, and when they are crisp,brown color,fold them.Dont flip the dosai.
* Serve it hot chutney or sambar....
* Our dinner today was ,rava dosai and radish sambar.....

Sending this to Aipi and Priya's "Bookmarked Recipes event"

Thursday, April 21, 2011

Mexican Tortilla Wraps

I am a freaky mexican cuisine lover.Love to have any dish of mexican cuisine.When I saw tortillas  in walmart,cud'nt resist from buying those.Here I have used chunky salsa for the spread.It was so flavourful.I have used chicken,egg and beans stuffing.Chicken was sauteed with garlic- chilly paste.Our dinner was very successfull.Hubby loved it.Rohith was curiously exploring the stuffings and started eating tortillas.Give it a try.


Ingredients:
1.Tortillas                            -        4
2.Cooked lima beans            -        1/4 cup
3.Eggs                                   -        2
4.Onion                                 -        1/2
5.Red and green peppers       -        1/2 in each colour
6.Mayonnise                          -        1/4 cup
7.Tomato Salsa                      -        1/4 cup
8.Cheese                                -        1/4 cup
9.Chopped cilantro                -        1 tbsp

For Chicken stuffing:
1.Chicken          -        1 cup
2.G&G paste     -         1 tsp
3.Turmeric pwdr-        a pinch
4.Garlic pods     -        3
5.Green chilly     -        1
6.pepper pwdr    -        1/2 tsp

Method:
For the chicken:
* Take a pressure pan,add chicken ,g&g paste and turmeric pwdr.(No need to add water,as chicken will leave out water)
* Pressure cook for a whistle.When the whistle is released,remove chicken from bones.
* Grind garlic and green chillies into a fine paste.
* Take a pan,add a tsp of oil,add the grinded chilli-garlic mix and saute it well.
* When the raw smell is removed,add the cooked chicken and scald in well.Add salt and pepper pwdr and toss it well.Remove from the flame and keep it aside.
* In the same pan,add egg and scramble it .Add alt and pepper pwdr .Keep it aside.


For the veges:
* Slice the onion and bell peppers into length wise.
* Take a pan add oil and saute the veges well.Let it be crunchy.Keep it aside.

Assembling the wrap:
* Take a bowl,add mayonnise and salsa together and mix.
* Slightly heat the tortillas both side.
* Now apply the mayonnise-salsa mix evenly.
* Take a hand full of sauteed chicken and egg.Place them at one end.
* Top it with sauteed veges,cooked beans and cheese.
* Finally squeeze out some lemon juice, garnish with cilantro.
* Fold and enjoy the wrap.


Note:
We can alter the stuffing according to our taste buds.I prefer to use a big sized tortillass for a comfortable wrap.But since ,I didnt get one,used a medium sized tortillas for the wrap.We can also use only salsa spread and can avoid mayonnise.

Tuesday, April 19, 2011

Anjaneyar vadai / Milagu vadai / Temple style crisp pepper vadai

Milagu vadai or pepper vadai are well known as Anjaneyar vadai.Because,these vadais are made as offerings to lord Anjaneya.These vadais are connected using a thread and garlanded to the Lord.The speciality about these vadais are ,they are fat free.Since ,we are not adding water to the mix while grinding,it will not absorb much oil.These also resembles the thattai.We used to munch these vadais,when we go to Nanganallur Anjaneyar temple.My SIL gave me the complete recipe and also a secret.If we are frying the vadai as normal vadais,then the crispness may not last longer.So inorder to retain the crispness,we are going to partial fry the vadais.Then we are going to deep fry them for the second time as batches.This wil make the vadais crisp.

Recipe Source: Viji Anni
Ingredients:
1.Urad dal                  -         1 cup   (160 gm)
2.Pepper                     -         1/2 tsp
3.Hing                         -         a pinch
4.Salt                           -        1/4 tsp

Method:
* Wash and soak the urad dal for an hour.
* Drain it and grind it in the mixie without adding water.
* The grinded mixture should be coarse not a paste.
* Mean while pulse the pepper and break it roughly.
* Take a bowl,mix the grinded urad dal,hing,salt and  broken pepper.
* Mix them well.
* Heat oil in a pan or kadai.
* Take a tbsp of hot oil and pour it on the vadai mix.
* This will make the vadai even more crisp.

* Take a ziploc cover,grease with oil.Grease ur hands also with oil to tap the vadai thinly.
* Take small lemon sized balls and pat it on the cover into a extremely thin vadai.
* Mark a hole in the centre.(This will cook the vadai faster.)
* Cook the vadai in oil on both sides.
* Remove the vadai,when it is light brown colour.(The trick here is, we are going to fry the vadai again in batches.This makes the vadai crisp always.Even after days.)
* Once all the vadais are cooked till light brown,place them on paper towels.
* Take the slightly browned vadais in batches and cook them again till it turns golden brown as shown in the 5 th picture.
* Store in clean ,air tight containers.The vadais will be crispy for longer,since we had double fried them.

Note:
* Ensure that,the vadais are patted thinly.If not they will become hard .
* At any point of time ,dont add water to the mix, while grinding.
* Making holes in the vadai will make the vadai to cook faster and crisper.
* Adding hot oil to the vadai mix will make them crisper and crunchier.
* When frying the vadai for the second time,keep an watch on the vadai,as there are chances to get black.
* We can also add  a tsp broken urad dal to the mix to get crunchier vadais.

Sending this to Aipi and Priya's Bookmarked Recipes


Saturday, April 16, 2011

Ghee - Clarified Butter -A pictorial guide for making Ghee

Ghee plays an essential part of life in Indian families.We used to prepare n number of dishes using ghee.The flavour has addicted everybody from kids to adults.Ghee has comparitively less fat than butter.We used to buy ghee from indian stores.But after my vacation to India,I had lot of  ghee packets bought from there.But it got over after a year.After a year,when I went to buy ghee in grocery store, I was totally shocked to see the prices.Usually it will be $10.99 per pound.The prices of ghee has gone upto 4 dollars more per 1000 ml.These things made me to think.

 From then ,I started buying butter and clarifying them.The cost of 450 gm (1 pound) butter is just $ 2.98.From this 450 gm butter,I am able to get around 400 gm of ghee.This has cost me 2 times less than the store bought ghee.Home made ghee has more flavour than the store bought.My mom used to put drumstick leaves at last to add flavour.Since we dont get here,I have substitued with curry leaves.This ghee can be prepared in lots and refrigerated.It has more shelf life.So my buddy home makers,start preparing ghee at home and reduce ur cost of budget.


Ingredients:
1.Butter                 -            1 pound
2.Curry leaves      -             few

Method:
* Bring the butter to room temperature.
* Take a heavy bottomed pan and add the butter sticks to it.
* Place the pan in medium low and stir it in equal intervals.
* At first there will be heavy froth on the top.
* Let it boil well.
* The butter will change colours at every stage.
* Initially it will be light yellow,then dark yellow and at last light brown.

* Stir the butter in between.
* Watch carefully,as there are chances for the butter to get dark soon.
* Once it comes to the light brown colour stage,then turn off the stove and add curry leaves.
* Let it cool completely.Filter the ghee and transfer it to another container.
* Store it in a dry place.
* Since , I have used just 1 pound butter,I didnt get much froth on top.If u r using greater quantity then there is a need to remove the excess froth .

Note:
The prepared ghee will look like sesame oil in colour immediately after turning it off.
After transferring the ghee to the bottle,the residue can be mixed with ragi flour and sugar to be more delicious edible  mix.
When refrigerated ,has a longer shelf life upto 6 months.
Heavy bottomed pan ensures ,that we get the right colour.if not it will blacken quickly.

Thursday, April 14, 2011

Puran Poli / Paruppu poli - Tamil New year special

Wishing u and ur family a wonderful and  prosperous new year.May god bless u with abundant wealth and health.This is a very special occasion for us.My mom and MIL will prepare a feast and all our relatives will gather and have fun .Since we are all alone here,I prepared  a simple meal with Tomato sambar,pudalangai poriyal,rasam, puran poli and milagu vadai.I have prepared chana dal filling for the poli.The poli was awsome and was soft too.I have adapted from saras.Give it a try ,u will love it.Will post the recipe for milagu vadai soon.

Recipe Source:
Saras Kitchen

Ingredients:
For Dough
1.All purpose flour / Maida - 11/2 cups
2.sugar - 1tbsp
3.Oil - 1/4 cup
4.Salt - A pinch
5.Food lemon color - As required

For Filling:
1.Channa Dhal - 3/4 cup
2.Jaggery - 1 1/2 cup
3.Ghee - 1 tbsp
4.Cardamom pwdr.

Method:
For the dough:
* Mix all the ingredients ,except oil and prepare a soft and elastic dough.
* Knead it well for atleast 5 minutes.
* Cover the dough with oil and keep it aside for an hour.
* Take the dough and knead it again.
* Divide them into equal sized balls.


For the filling:
* Pressure cook the chana dal with 1 cup of water.
* After the whistle is removed,strain the water.smash it well.
( My dal was over cooked,so I took a muslin cloth and squeezed out the excesss moisture.)
* Take a pan ,add jaggery and little water.
* Turn the stove to medium low and let the jaggery get dissolved into the water.
* Filter the jaggery and again mix with smashed chana dal .Add ghee and cook the mixture.
* The moisture in the jaggery- chana dal mix will get reduced ,when we cook it .
* Turn off the stove ,when the mixture curdles like halwa.Add cardamom pwdr.
* Cool completely and divide the mixture into equal sized balls.

Assembling:
* Take the dough- ball,tap it and place the filling inside.
* close and roll it as a thin chapathi.
* Cook it in a tava for 2 minutes ,both sides.
* Apply ghee to both sides and store it.

Note:
We can use any filling for the poli like coconut,dry fruits etc.Adjust the filling according to the dough balls.

Wednesday, April 13, 2011

Roomali Roti

Roomal means kerchief.Roomali roti means rotis made as soft and thin as kerchief.This roti has both flours mixed together and prepared as a tandoor roti.Bcoz,rotis are prepared on a red hot kadai,inverted over the stove.These rotis were soft and thin.It went well for our party.Rotis can be had with any side dish.


Ingredients:
1.Wheat flour                   -                1 cup
2.All purpose flour          -                 1 cup
3.water                            -                 1 cup
4.Oil                               -                  2 tbsp
5.Salt                               -                 as required

Method:
* Take a mixing bowl,add all the ingredients except oil.
* Prepare a soft and elastic dough.
* Apply oil and keep it aside for an hour.
* Knead it again well.
* Divide the dough into equal sized balls.


* Dust the floor with flour.
* Roll the balls into a thin - big sized roti.
* Mean while place a pan or kadai inverted over the stove.
* Let it be really hot.
*  Now tap the excess flour and  place the roti on the kadai.
* Immediately the rotis will start bubbling.
* After a minute,flip it over and cook for a minute as shown in the picture.
* Brush the rotis with oil or ghee and fold it.
* Serve it with any side dish.
Note:
After rolling the roti,we can just pull it a bit to enlarge it.To get a large sized roti,the dough shud be very soft and sticky.Dont keep the roti on the kadai more than 2 minutes,if not it will become stiff and crisp.

Monday, April 11, 2011

Fish Fingure or Fish sticks

Fish fingures are prepared by marinating the fish ,breading it and frying.These are very famous appetizers in Chennai hotels.I had some tilapia fillets ,so tried with that.It came out reall good.My family thoroughly enjoyed it.The besan makes the fish to get the preferred coating.

Ingredients:
1.Fish                          -                3
2.Besan flour               -                1/2 cup
3.Bread crumbs            -                1/2 cup
4.Chilli pwdr               -                 1 tbsp
5.Turmeric pwdr          -                 a pinch
6.G&G paste                -                  1 tsp
7.Garam masala pwdr  -                   1/4 tsp
8.Curry leaves              -                  few
9.Lemon                        -                  1/2

Method:
* Cut the fish into fingure like shaped pieces.
* Take a mixing bowl,add chilli pwdr,turmeric pwdr,ginger garlic paste,garam masala ,chopped curry leaves and lemon juice.Mix them well with salt.
* Now coat the fish pieces and marinate them over night.


* In a separate bowl,add besan flour and bread crumbs,mix them.
* Now, take each fish and roll them in the besan- bread crumb mixture ,tap the excess flour and keep it aside.Coat all the fishes with the besan mix.
* Deep fry them in oil.
* Serve them with yogurt dip.

Note:
If u dont have time,then u can marinate the fish for an hour also.The more u marinate,the more juicy fish will be.


Wednesday, April 6, 2011

Sree Krishna Sweets Mysore Pa - My 200 th Post

  Happy to share with u my moment of joy.This is my 200 th post.Wanted to prepare some sweet for this joyous moment.So I prepared this mouth watering Mysore pak.Plz friends,take some sweet from my platter.I take this precious moment to thank all my friends and fellow bloggers for giving me their endless support.
  The original "Krishna Sweets " recipe calls for  besan: Sugar : Ghee in the ratio 1:3:3.But to reduce the calorie value,I have took 1 cup besan,21/2 cups sugar and 2 1/4 cup ghee + 1/4 cup oil.Addition of oil,has not altered the taste.If u want to have only ghee,then go ahead and have 2 1/2 cups of ghee.The sweet has to be mixed thoroughly and continuously till the end,if not u will not be able to get a super soft ,melt in the mouth type of mysore pa.This is yet another easy and tasty sweet.Rohith and H thoroughly enjoyed the sweet.It vanished in hours.So gal,give it a try ,u will love it.Will update the step wise pictures later.Cannot take ,as I  was busy mixing.


Ingredients:
1.Besan Flour                 -          1 cup
2.Sugar                           -           2 1/2 cups
3.Ghee                            -           2 1/4 cup
4.Oil                               -           1/4 cup
5.Water                           -           1/2 cup

Method:
* Take a pan, dry roast the besan flour,untill nice aroma comes out.Keep it aside.
* Mix the besan with oil and keep it aside.We have mixed the oil,to avoid lumps while mixing.
* Now in the same pan,add sugar and water.
* Let it come to a boil.Now the sugar syrup will start bubbling.
* Take a small pinch and expand the syrup.It should form a single thread.
* This is the right consistancy.
* Slowly add the  besan .Mix it while adding.
* From here onwards,dont stop mixing.Your hands shud be working till the end. I know its the toughest part.But the outcome is so perfect .
* Mean while heat the ghee ,slowly pour  it to the mixture.
* The mixture will start gulping the ghee and at one part of time,the mixture will start curdle like a thick halwa.Make sure it is thick enough ,by taking a pinch out and try to roll it like a small ball.It shud form a ball.This is the right consistancy.
* Pour the mixture in a greased pan and let it cool completely for 20 minutes.Then cut them into ur desired shapes and store them in a dry container.


 Note:
While adding the ghee,it should be hot.This will make the mysore pak a little softer.At any point of time ,dont leave ur hand from mixing .Since this is the first time,I used 80 gm cup to measure the ingredient.I got 12- 15 pieces.If u r using standard 240 gm cup,then u will get more pieces.
Updated note:
By mixing the oil to the besan,we need not want to mix the besan continously.We can have some rest ,because now its easy to mix well.


Tuesday, April 5, 2011

Peerkangai Thol Thuvayal / Ridge guard skin chutney - version 2

I am totally out of my mind for the past 4 days.Men in blue has been terrific in their performance and made me sit in front of the television till the finals.We enjoyed the finals in my friend's house.It was a big group cheering  and shouting for the Indian players.I cannot control my nerves after watching Dhoni's superb Six.That was the reason,I was completely out from my blogging world.From today,I will be active in blogging,sorry folk for not checking ur wonderful posts.Will check it from today.

I love to make chutney with the ridge guard skin.I used to prepare it differently.When I saw a different version on Divya's page,wanted to try them immediately.It was flavourfull and yummy.The addition of peanuts and sesame seeds made the wonder.Adding jaggery is completely to our taste.I have omitted that .My H enjoyed the chutney,to my surprise.Give it a try,u will love it with hot piping rice.

Recipe Source:   Divya's Recipe


Ingredients:
1.Ridge gourd Skin  -                    1
2.Red chillies           -                    4 to 5
3.Cumin Seeds          -                    1/2 tsp
4.Coriander Seeds     -                    1/2 tsp
5.Sesame Seeds         -                    3 to 4 tbsp
6.Tamarind                 -                    gooseberry size
7.Turmeric powder     -                    1/2 tsp
8.Jaggery                      -                   1 tbsp
9.Peanut                       -                    1 tbsp

For Seasoning   :
1.Mustard seeds              -            1/2 tsp
2.Red chillies                     -                1
3.Asafoetida / Hing            -            a pinch
4.Curry leaves                    -                  few
5.Oil                                   -            1/2 tsp


Method:
* Peel the skin of the ridge guard along with some flesh.
* Take a pan,add little oil and roast all the ingredients one by one.
* Now add the ridge guard skin and cook till it turns colour.
* Cool the roasted mixture completely .
* Grind them into a nice paste adding little water.
* Take another pan.add oil and splutter with the "Seasoning ingredients"
* Pour it over the grinded chutney and mix.
* Enjoy with white rice.

Sending this chutney to Aipi and Priya's "Bookmarked Recipes Events"

You might also like

Related Posts Plugin for WordPress, Blogger...